When taking pictures without a tripod, your images will come out blurry due to the unsteadiness caused by unstable camera movements. With a good quality tripod in your kit, your shots will come out more true to life and professional-looking than if you hadn’t used a tripod at all. However, some tripods can be expensive, or perhaps you need one asap and don’t have time to wait for delivery. In that case, it’s time to have a go at making your very own DIY tripod.
This tutorial is designed to show you how to make a tripod for photography, step by step. It will cover the materials you will need, basic instructions on how to put together your tripod, and some final notes of caution. With this knowledge in hand, you can make your own tripod and take stunning photographs!
Although using a smartphone is extremely popular with amateur photography and when shooting videos for budget productions, a mobile phone doesn’t compare to the details caught on a good camera. Therefore, the instructions below are to make a tripod stand for a camera, such as a DSLR, not a smartphone.
Making Your Tripod: Step By Step
Below you’ll find a list of the necessary materials and tools required for your DIY tripod. Most are common household items, but some :
Materials Needed
1/4 inch wood screw or bolts: You need to buy 2-5 of these little buggers. About $10 will get you just enough. They come in different screw sizes and different lengths, so I recommend buying 5-10 of them. If you want to be super fancy, you could buy some longer ones for more stability between your legs and the tripod head, but for this project, a bunch of shorter ones will work perfectly fine!
Plate or thin piece of metal or wood: I used a thin piece of metal from an old milk jug in my stash that was slightly larger than the diameter of my tripod legs. The thicker the metal, the better; you don’t want it to bend. You can also use a thick scrap of wood or piece of metal from an old CD rack (or similar).
Wooden dowel: I bought this wooden dowel at home depot for $6. This will be used to help connect the ball head to the tripod.
½ inch bolts: The piece of wood/metal will need a hole in it to hold a ½ inch bolt and nut. This is what attaches the tripod head to your camera. If you already have a screw hole on the bottom of your tripod head, then you don’t need to buy this part.
Ball head: Even if you have an old camera that doesn’t take a ball head, your camera and tripod head should still work together! The base of your camera should screw into the ball head, and the neck of your ballhead should connect to the bottom of your tripod. If you can’t get a ball head for free, definitely buy one. These are very inexpensive in stores, usually around $20-30.
Washers and nuts: These are optional. These will hold your camera onto your tripod head. You may need to use these to attach a camera or a different kind of device to the tripod head.
Wood for legs: Use three pieces of natural solid or man-made wood you can find at a local home improvement store. Ideally, they should be cylindrical. I used scrap wood from an old table for the legs, but you can also use some leftover pieces of plastic tubing or metal pipe.
NB: If you happen to have some leftover plastic, keep it aside because if you’re interested, my next article will discuss how to make a selfie stick for an iPhone (which is very easy with some plastic tubing and binder clips!).
Paint: This is optional, but I did it for look’s sake, just for fun. You can buy spray paint in most craft stores that come in different colours and finishes. You can also use acrylic paint to cover the wood with various colours and patterns. If you’re looking for something more earthy and natural-looking, try using some moss to paint over the wood before attaching it together!
A drill: Make sure you have a drill long enough to go through your 1/4 inch bolts, whatever plates or metal you’ll be using, and into your wood (this will make drilling much easier). A hand drill will work fine for this project as well.
A screwdriver: Any kind will do, depending on which screws you have.
Assembling The Parts

Painting
Paint your parts with your chosen finish or colour. You can also paint both sides of your wood to make it look even more natural. You can use a deep wood stain or a paint with a finish that looks like natural wood. To fix the legs to the upper and lower sections, put two 2-inch long screws through each end of the central pole and each leg, screwing them on tightly until they are flush with the top of your tripod body.
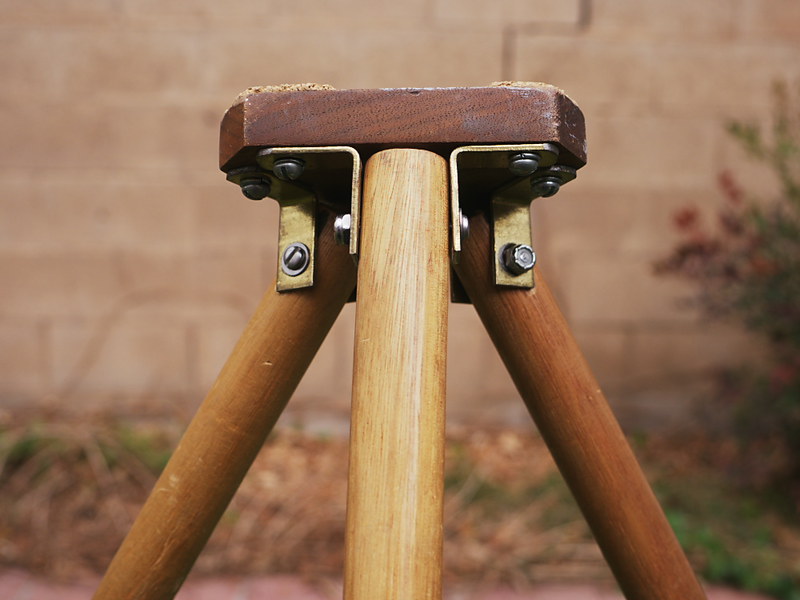
Attaching The Legs
When attaching the tripod legs to the central pole, make sure you measure them to the same length (and same size, i.e., diameter, especially if they’re tapered) and then put them together square. This will add stability and prevent the centre pole from wobbling out of place should something shake it around.
Mount your plates by screwing two bolts through each plate and into each leg, tightening them until they are flush with each end of your central pole.
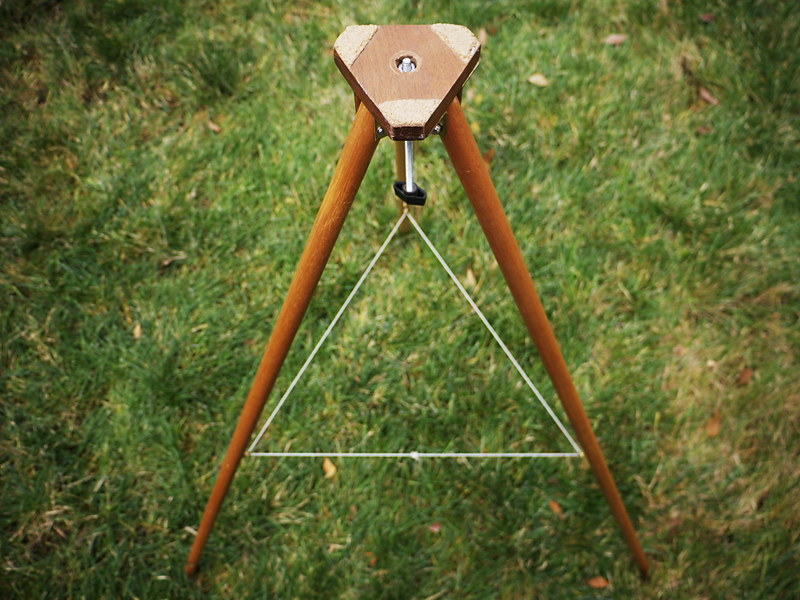
Setting Up Your Tripod
Fixing The Head
Creating a tripod like this one is a little tricky if you’re using sections of wood or other material that don’t come naturally together. If you’re using wood or large metal pieces that don’t fit together as easily, drill a hole in the centre of each piece of wood or metal and screw them together. If you’re using small pieces like I did, you can use bolts and washers to connect each part of the tripod together.
Once you’ve finished putting your tripod together, place it on an even surface for easy access to tighten screws and add more washers or plates.
Setting Your Camera Down
When attaching your camera to the tripod head, make sure it is level before connecting it. You can do this by using a spirit level (if you have one) or by using a half-full water bottle (if you don’t have one).
Levelling Up
Additionally, further levelling can be achieved by taking a picture of the horizon and then ensuring the camera is level with that image. This will allow you to see if your tripod is at a good angle and straight for the horizon for shooting better photos. Additionally, look through the screen or shoot a series of short videos (if required) for a better idea of the horizon. When you watch the video footage, it’s easier to distinguish if the stand is straight as opposed to when simply looking through the viewfinder.
Further Adjusting The Level
You won’t be able to tilt and adjust the head to the required position as you would in professional purchased tripods, so instead, you may need to place something sturdy under the required leg to get the correct levelling. Then, take another shot, and confirm whether or not the photos are level with the horizon.
Tightening Up
Once your DSLR is sitting level and straight, attach it to the head by screwing a bolt through the holes in your camera and into the bolts on the tripod head. Make sure everything is tight, so it doesn’t go anywhere. If all is well, you can begin setting up and using the tripod.
Adding Stability
Sometimes, if the tripod is too light or isn’t very secure, you’ll be required to further stabilize it to reduce shake. So, for added weight, you can fill an empty water bottle and attach it to the centre pole using string or tape.
Summary
Well, there you have it! A cool money-saving project you can follow to make your own DIY tripod using some basic tools and materials.
Don’t forget to share pictures (or videos) of your finished project with me and post details of your creations in the comments below. I’d love to see what you create and be sure to share new ideas if you have made a different type of makeshift tripod already.
Like this tutorial? Make sure to check out my others.
Additional Resources
Sources and References
- Home Made Wooden Tripods – woodgears.ca
Sam loves to learn about animals and their habitats. He has been a nature lover from a very young age, and has been writing papers and articles about wildlife for as long as he can remember.