Learning how to shoot wildlife photography can be a wonderfully fulfilling experience. With the right training, wildlife photographers can capture some of the world’s most incredible images. Whether you’re shooting snaps of eagles in flight or tigers mid-pounce, the opportunities are endless.
The great thing about wildlife photography is that it is something you can learn over time. If you’re committed to practising your craft and have the patience required to wait behind your camera in search of the ideal image, you can even become a professional.
While it takes quite a bit of training and practice to learn how to photograph animals perfectly, there are a few steps you can use to begin taking better wildlife photos immediately. Today, we’re going to provide an insight into some of the critical tips you’ll need for a great wildlife shot.
Wildlife Photography 101: Camera Settings
Are you wondering what settings you should use for wildlife photography? One of the most important factors in ensuring amazing wildlife photography is to get the settings right. Everything from shutter speed to ISO settings can impact the way you photograph wildlife.
While your exact requirements may differ depending on the kind of photography you’re doing and your inherent skills, there are a few simple tips you can follow, for instance:
1. Set a Mid-Range ISO
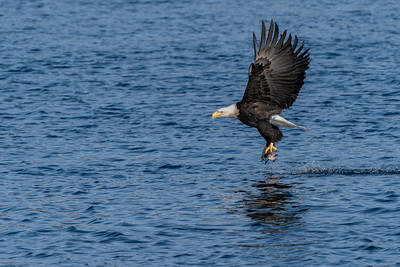
Usually, the best photos of the natural world will set an ISO range in the mid-level, somewhere between 400 and 800. This should ensure you can shoot with a fast enough shutter speed to freeze the motion of different animals in action.
If you can get the ISO even higher, you can capture the most detailed depictions of any bird or animal. A higher ISO and shutter speed mean you do need a lot of focus and light, however.
2. Use Aperture Priority Mode
Though not the ideal choice for every photographer, many wildlife photography experts choose to shoot in aperture priority mode. This can help you get an exposed image of moving animals at a relatively close distance while maintaining a lot of control. Aperture priority can reduce your risk of an underexposed subject.
3. Focus on Shutter Speed
The faster the shutter speed, the easier it will be to capture your subject in mid-motion. Often, it’s a good idea to take photographs in continuous mode when snapping images of a running animal or flying bird. This technique will help you capture animals in a range of different frames, allowing you to pick the best shot out of a selection.
4. Set a Wide F Stop
Once again, choosing the correct settings for your wildlife photography can be something that requires regular practice and experimentation. The F stop or aperture mode of your photos generally needs to be reasonably wide to allow for more light in the lens and a faster shutter speed.
What Is the Best F Stop for Wildlife Photography?
Wide-open apertures are ideal for capturing the perfect moment in nature, even in low light conditions. Most photographers will recommend using the widest aperture you can manage, somewhere between F/2.8, F/4, or F/5.6. Wide-apertures with long zoom lenses allow you to isolate the subject within the image and blur the background with a manual focus point.
The motion blur in the background can produce great images by allowing you to naturally highlight the shot’s focus. Since you can’t control the motion of animals, it’s often difficult to get the environment and the movement of the subject both perfect within a shot.
How Do Wildlife Photographers Get so Close? Tips and Tricks
Understanding how to arrange your settings for good wildlife images is only one aspect of shooting nature effectively. If you want to get the perfect shot of an animal, you also need to understand how to get closer to your subject. The nearer you are, the less you’ll need to rely on zoom to bring your subject closer.
Various elements can damage your shot even with a great lens when you need to capture an animal with zoom. The lower your focal length, the better the clarity and quality of the picture. To improve your chances of getting closer to a subject:
Avoid a Direct Approach
Directly approaching an animal makes you seem more like a predator. If you want better photos, you need to find a way to approach from a distance without being in their direct line of sight. This could mean approaching indirectly and parallel to the animal.
Be Patient
Take your time when approaching the animal you want to shoot. This can make life very difficult when trying to get an image of certain birds or smaller animals. However, rushing in will simply scare the creature away. Take your time, and try to avoid moving in too quickly, particularly when the animal is on high alert.
Don’t Make Eye Contact.
Eye contact is another predatory behaviour that can send your animal skittering away. Try to avoid looking directly at the animal as you approach. If you can stay outside of your subject’s direct line of sight, this can be useful, too.
Dress Correctly
Avoid wearing clunky clothing that makes too much noise when you move. Excess noise will immediately drive your subject away. Think camouflage when choosing colours and try not to draw too much attention to yourself. You wouldn’t see a professional wildlife photographer in bright clothes.
Pack Properly
You don’t want to be carrying a lot of clutter with you, either. Practice taking incredible wildlife shots with minimal equipment whenever possible. This will ensure you don’t have to struggle as much to set up between shots.
How to Shoot Wildlife Photography
Shooting wildlife isn’t easy. If you’re going to become a professional wildlife photographer, you’re going to have to accept that you might not get great wildlife shots every time you go out with your camera. The average wildlife photographer will spend a lot of time being as quiet and patient as possible when on the hunt to reduce the risk of scaring away wildlife.
If you want to become a master in wildlife photography, you can start with the following wildlife photography tips.
1. Master Your Gear
One of the most important tips for wildlife photography is simply to know your gear and how you’re going to use it correctly. As mentioned above, certain settings and tools can make shooting wildlife a lot easier. Setting your camera up before you start seeking out wildlife will help you snap pictures quickly without too much fuss.
Learn exactly where buttons are on the camera body, so you can access them in an instant, and make sure you’re comfortable switching rapidly from one set of pre-sets to another. You might need a selection of different shutter speeds and apertures depending on the focus points of your pictures.
2. Know the Location
The destination where you’re going to photograph wildlife will greatly impact your professional experience. The best way to get ahead of the game is to do a Google Image search and scan through the pictures taken in the region. You can search through websites to get a better idea of the kind of terrain you’ll be dealing with.
Knowing your location will make it easier to prepare your camera with the correct settings, and it should ensure you can dress appropriately for the occasion. Remember to check the weather before you start your wildlife photography trip; otherwise, you could end up wasting your time.
3. Practice Constantly
Whether you’re photographing wildlife or weddings, one of the most important things you can do is practice. Take these wildlife photography tips and work on shooting animals in your local area, even if it’s just common birds and other creatures you encounter every day.
The more you practice your photography skills, the more aware you’ll become of different elements which may negatively influence you when you’re professionally photographing. For instance, you might have too much camera shake in colder environments, or you might make too much noise when you’re walking through the woods.
4. Get the Lighting Right
It’s common to find wildlife photography tips that pay a lot of attention to the importance of the “golden hours” for lighting. However, while the light is very important for good wildlife photography, you don’t have to wait for this specific hour to take an excellent shot.
Experiment with lighting at different times of the day. You can capture some great wildlife photos by continuing to take a variety of pictures in all kinds of conditions. Don’t forget there are many tools that can help you reduce some of the contrast or glare in your images in some cases.
5. Take Wide, Low Shots
While zooming in on your subject can be an excellent way to get a great picture, don’t underestimate the value of wide shots. As a wildlife photographer, you’ll need to remember that close-up isn’t always the best option for your composition. Sometimes, a zoom can create too much noise in the image. Taking a step back and shooting white can tell more of a story about your subject.
Going low is also an excellent idea for wildlife photography. The lower you are, the more you can control the depth of field and the overall impact of the image. On some occasions, you can photograph wildlife in a downward motion to highlight how small the creature is, but lower shots have the best visual impact.
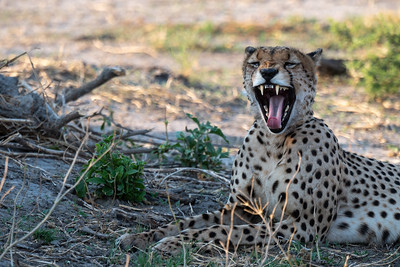
6. Focus On the Eyes
If you’re unsure where to focus your camera for the best photo, consider starting with the eyes. The eyes in a photo of an animal are often the first thing we notice in any picture. Concentrate your lens on capturing the unique emotion in each animal’s eyes as it observes and responds to the environment around it. This is one of the best forms to capture the truth of nature.
Remember, for the eyes in your photo to have the best possible impact, they need plenty of light to be reflecting on them. With that in mind, it’s a good idea to position your camera in a way that allows you to capture every glint perfectly. When photographing wildlife, you’ll learn the secrets of each animal. For instance, it’s easier to capture the eyes of a predator with a larger brow in the late afternoon or morning when the light is a little flatter.
7. Keep Shooting
One of the best wildlife photography tips any professional can give you is to continue shooting for as long as possible. The more photo options you collect, the easier it is to find the perfect image for your needs. You can set continuous autofocus and capture dozens of shots at once, so it’s much easier to choose from a wide variety of pictures to get the best shot.
Taking regular photos of nature on a consistent basis is a fantastic rule for good photography. As soon as you put down your camera, you risk missing something incredible. Commit to carefully going through each photo to see which images deliver the best results. It might take some time, but it’s definitely worth it.
Remember to consider photographing wildlife from various angles and positions, too, to get different perspectives. Make the animal smaller or larger in your lens, or look at them from a different angle in the surrounding nature.
Mastering the Art of Wildlife Photography
Capturing the perfect photo as a wildlife photographer takes a lot of time, practice and focus. The wildlife photography tips shared above should help get you on the right path. However, don’t expect to become an expert in all things related to animal images overnight. These creatures are elusive subjects and very difficult for photographers to control.
Ultimately, you’ll need to prepare for anything and expect nothing to thrive as a wildlife photographer. These are just some tips and tricks on how to shoot wildlife photography: keep practising, and master your skills gradually. Eventually, you’ll end up with at least one amazing shot in your collection.
Additional Resources
- How to Clean Binoculars
- What Is the Best Magnification for Bird Watching Binoculars
- Best Cameras For Bird Photography
Sam loves to learn about animals and their habitats. He has been a nature lover from a very young age, and has been writing papers and articles about wildlife for as long as he can remember.